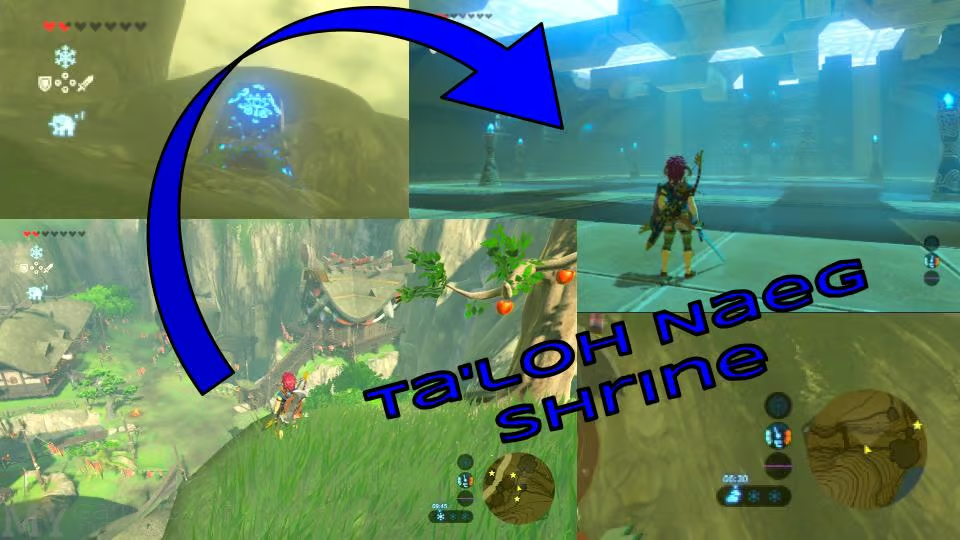
Ta’loh Naeg is the shrine of Kakariko and is one of the most teleported to shrines as it is the nearest to Impa, a character who reappears throughout the story due to Link’s quest to find his memories. Here’s how to complete it.
Location
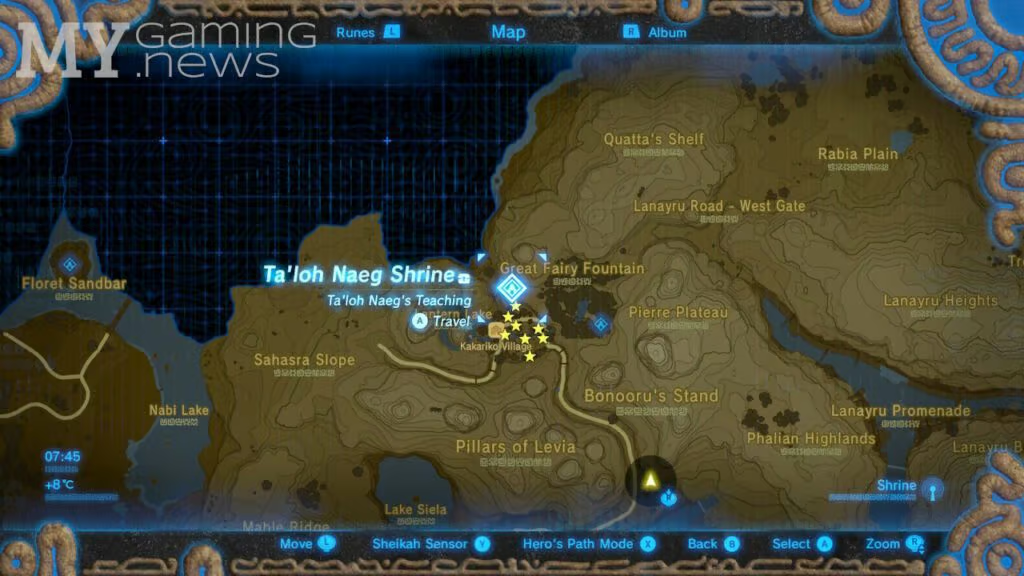
Ta’loh Naeg is located in Kakariko Village of the Necluda / Dueling Peaks’ region, it is north-east of the Dueling Peaks and is surrounded by mountains. The Shrine itself is situated on the hillside above the cucco area – to the right of Impa’s house. Further along the path from the shrine is the Village’s resident Great Fairy.
Ta’loh Naeg Walkthrough
The concept of this shrine is to teach the player how to use more advanced combat techniques than just swinging your weapon around – hence the name Ta’loh Naeg’s Teaching. As you enter the shrine, you will be able to see the arena where you will battle a Training Guardian, two chests and the gateway to the monk.
Firstly, open the two chests to your left and right. The first contains a Shield of the Mind’s Eye; the second contains an Eightfold Blade. If you are visiting this shrine early on and don’t have good weaponry, I recommend collecting these; if you skipped this shrine early on and are revisiting it later on then chances are you’ll have better gear.
As you walk forward, the Guardian will appear but it won’t escape from its position to attack you, instead it will remain still until you get close – at which point, it will attack you. The monk will speak to you and teach you to do four things: a side flurry rush, a backflip flurry rush, a perfect parry and a charged attack.
Flurry Rushes
The flurry rush is an attack strategy which will come in immensely helpful throughout the course of the game so it’s a good idea to learn it now. First, target the enemy – in this case the Guardian – using ZL (the back-left button). Next, walk closer to it and wait for it to attack. Just before it is about to strike, jump away from it to activate the flurry rush!
You’ll need to jump in a different direction depending on the enemies orientation of attack. If the enemy attacks with a vertical strike, you’ll need to utilize a side hop to dodge the attack flurry rush. If the enemy attacks with a horizontal strike, you’ll need to utilize a backflip to dodge the attack flurry rush.
As I said before, flurry rushes are monumentally useful and help with fights against Blight Ganons, Lynels and even the Calamity – though he can be defeated in thirty seconds!
Perfect Parry
The next thing the monk will teach you is the perfect parry. This is simply performed by targeting the enemy – in this case the Guardian – using ZL (the back-left button) and pressing A when it launches an attack to parry the attack with your shield and knock it back! Then, press Y repeatedly to attack the enemy in its collapsed state and deal plenty of damage.
Charged Attack
The final teaching is definitely the easiest. All you need to do to perform a charged attack is press and hold the Y button until you get a sort of, ‘shing,’ sound. The attack uses stamina quickly but it deals more damage than a regular attack and launches a 360 slash of Link’s sword. The more, ‘shings,’ you use will increase the power of the attack and the size of the circular slash with a maximum of three, ‘shings.’
After this, the Guardian will be defeated and you can pass through the gateway to a chest and the monk. Talk to Ta’loh Naeg to get your spirit orb!
Full Video Walkthrough
I hope you enjoyed this article and I hope it helped! Feel free to check out our other cache of Shrine Walkthroughs to find whichever one you’re looking for!
You may also be interested in:
 Ree Dahee Shrine / Timing is critical – BotW
 Ha Dahamar Shrine / The Water Guides – BotW
 Shee Vaneer Shrine + Shee Venath Shrine / Twin Memories – BotW
 Hila Rao Shrine / Drifting / Watch out for the Flowers – BotW
 Toto Sah Shrine / Toto Sah Apparatus – BotW
 Lakna Rokee Shrine / Lakna Rokee’s Blessing / Kakariko Side Quests – BotW
 Dueling Peaks Shrines Recommended Order (BotW)
 Chaas Qeta Shrine / A Major Test of Strength – BotW